结合 MIT-6.828-2019 的各个 lab 来简单写下学习操作系统的学习心得。
在进行相关labs前建议先看看xv6的中文文档(当然能直接看英文文档更好)
环境搭建
实名羡慕MIT学生不用搭建xv6环境,直接ssh连接MIT提供的配好的环境就可。
xv6 is a re-implementation of Dennis Ritchie’s and Ken Thompson’s Unix Version 6 (v6). xv6 loosely follows the structure and style of v6, but is implemented for a modern RISC-V multiprocessor using ANSI C.
我个人使用的虚拟机,但不建议用ubuntu,那个小水管的网速属实堪忧,哪怕找到了gitee镜像,但我下的时候qemu还是10kb/s上下浮动,同时还伴有EOF error,后来索性改用debian,瞬间幸福感就起来了QAQ
根据MIT 6.828官方指南使用Debian只需一行就能搞定。但我一开始忽略了小字,Debian要做6.828fall19实验的话,不能安装稳定版本buster,需要安装测试版本bullseye。安装完buster一顿操作猛如虎的我不禁流出泪来QAQ
安装好bullseye后su root切到root账号执行工具下载:
1 | sudo apt-get install git build-essential gdb-multiarch qemu-system-misc gcc-riscv64-linux-gnu binutils-riscv64-linux-gnu |
切root后建议先修改/etc/sudoers来把用户的权限提上来
构建xv6
打开xv6-riscv-fall19文件夹后make操作无误后再输入make qemu如果这时报错Cannot allocate memory可能是设置虚拟机时候内存设小了,我设2G内存时候就会报错,可以free -m看一看那一点点可用内存,还是乖乖设置成4G比较合适,至少我能跑通了(感天动地)成功后有如下输出:1
2
3
4
5virtio disk init 0
hart 1 starting
hart 2 starting
init: starting sh
我们可以用ls查看一下初始的文件系统里都有啥programs/files:1
2
3
4
5
6
7
8
9
10
11
12
13
14
15
16
17
18
19
20
21
22
23
24
25
26
27
28 ls
. 1 1 1024
.. 1 1 1024
README 2 2 1982
xargstest.sh 2 3 93
cat 2 4 22568
echo 2 5 21456
forktest 2 6 11768
grep 2 7 25960
init 2 8 22168
kill 2 9 21400
ln 2 10 21360
ls 2 11 24856
mkdir 2 12 21512
rm 2 13 21496
sh 2 14 40280
stressfs 2 15 22496
usertests 2 16 107504
wc 2 17 23720
zombie 2 18 20888
cow 2 19 28840
uthread 2 20 24528
call 2 21 21456
kalloctest 2 22 26296
bcachetest 2 23 27400
mounttest 2 24 33064
crashtest 2 25 22616
console 3 26 0
退出qemu就比较玄妙了,先按下Ctrl 键和A键, 然后释放这两个键,再按X键即可退出,不能同时按三个键哦。
syscall
| system call | description |
|---|---|
| fork() | Create a process |
| exit(xstatus) | Terminate the current process with xstatus indicating success or failure |
| wait(*xstatus) | Wait for a child process to exit and copy the child’s exit status to xstatus |
| kill(pid) | Terminate process pid |
| getpid() | Return the current process’s pid |
| sleep(n) | Sleep for n clock ticks |
| exec(filename, *argv) | Load an executable file and execute it |
| sbrk(n) | Grow process’s memory by n bytes |
| open(filename, flags) | Open a file; the flags indicate read/write |
| read(fd, buf, n) | Read n bytes from an open file into buf |
| write(fd, buf, n) | Write n bytes to an open file |
| close(fd) | Release open file fd |
| dup(fd) | Duplicate fd |
| pipe(p) | Create a pipe and return fd’s in p |
| chdir(dirname) | Change the current directory |
| mkdir(dirname) | Create a new directory |
| mknod(name, major, minor) | Create a device file |
| fstat(fd) | Return info about an open file |
| link(f1, f2) | Create another name (f2) for the file f1 |
| unlink(filename) | Remove a file |
讲道理,写过操作系统实验的对上面xv6提供的系统调用大部分应该都蛮熟的,拿个简单例子演示一下,像fork父进程中return子进程PID,子进程中return0就不多说了。
1 | int pid = fork(); |
父进程一旦调用了wait就立即阻塞自己,由wait自动分析当前进程是否有子进程退出,如果找到了一个已经变成僵尸的子进程,wait就会收集这个子进程的信息,并把它彻底销毁后返回子进程的pid;如果没有找到这样一个子进程,wait就会一直阻塞在这里,直到有一个出现为止。
child: exiting
parent: child=31
child 31 is done
下面代码截取自常用的cat程序,从标准输入复制数据到标准输出。read(fd, buf, n),最多从fd对应文件里读n bytes到buf中,return读取的字节数。write(fd, buf, n)最多从buf里写n bytes到fd对应文件中,return 写入的字节数。n = read() / write()每次读写都会把对应fd的offset往前推n bytes,让读写可以源源不断的按序进行。
1 | char buf[512]; |
sleep
Talk is cheap,我们尝试下6.828的第一个简单的exercise,在xv6/user/下写一个sleep.c吧:
Implement the UNIX program sleep for xv6; your sleep should pause for a user-specified number of ticks. (A tick is a notion of time defined by the xv6 kernel, namely the time between two interrupts from the timer chip.) Your solution should be in the file
user/sleep.c.
TIPS: The command-line argument is passed as a string; you can convert it to an integer using atoi (see user/ulib.c)
1 |
|
然后打开Makefie输入/UPROGS定位以后加上$U/_sleep\然后wq再键入 make fs.img编译user programs即可。完成之后make qemu输入sleep 20测试下功能是否正常。
pingpong
Write a program that uses UNIX system calls to ‘’ping-pong’’ a byte between two processes over a pair of pipes, one for each direction. The parent sends by writing a byte to
parent_fd[1]and the child receives it by reading fromparent_fd[0]. After receiving a byte from parent, the child responds with its own byte by writing tochild_fd[1], which the parent then reads. Your solution should be in the fileuser/pingpong.c.
A pipe is a small kernel buffer exposed to processes as a pair of file descriptors.
父进程->pfd1->pipe->pfd0->子进程;子进程->cfd1->pipe->cfd0->父进程。一个pipe(fd)只能单向传递,fd[0]表示读端, fd[1]表示写端。所以要开两个pipe,大概是pipe([pfd0, pfd1]), pipe([cfd0, cfd1])这样。pipe会修改传进去的fd数组,所以不用担心没有初始化的问题,fork之后父子进程就可以借此完成通信了。
1 |
|
primes
Write a concurrent version of prime sieve using pipes. This idea is due to Doug McIlroy, inventor of Unix pipes. The picture halfway down this page and the surrounding text explain how to do it. Your solution should be in the file
user/primes.c.
1 |
|
find
Write a simple version of the UNIX find program: find all the files in a directory tree whose name matches a string. Your solution should be in the file
user/find.c.
在xv6中一个文件夹实质上是一个包含了很多dirent结构体的文件,每个结构体就是iNode和文件名的打包。我们可以传struct stat st进fstat函数来判断文件类型(dir or file),递归find时要跳过.和..两个特殊路径。
1 |
|
1 |
|
char* fmtname(char *path)函数是白嫖的ls.c源码,不过ls.c里的fmtname函数会截取当前目录文件名后再自动补齐空格到定长,也就是加padding,但是我们需要strcmp比较,肯定不能让它补齐,所以稍微改了一下。
if (de.inum == 0) continue这句,这句是xv6自有的ls.c里的源码,官方文档里有这么一句 Directory entries with inode number zero are free. 而对于memmove(p, de.name, DIRSIZ)这句,function void *memmove(void *str1, const void *str2, size_t n) copies n characters from str2 to str1
char* p = buf + strlen(buf); *p++ = '/';这个应该不难理解,p初始是把指向buf的指针推strlen(buf)个位置,也即到’/0’的位置,然后把这个位置赋’/‘并把p指针再推一位,之后memmove(p, de.name, DIRSIZ)把de.name全部复制到p指针的位置,然后在复制完的后一个位置把值置0(类似于’/0’,我在printf.c里找到这一句for(; *s; s++) consputc(*s);有理由相信xv6字符串置0是起到了终止符的作用)
xargs
Write a simple version of the UNIX xargs program: read lines from standard input and run a command for each line, supplying the line as arguments to the command. Your solution should be in the file
user/xargs.c.
大概意思是,除xargs后的参数外,回车后,接收标准输入的每一行为参运行程序。
1 |
1 |
|
启用pass而不是直接上xargc是因为exec接收指针数组,但是指针数组赋值时候,不能直接memmove呀,你首先要malloc这就麻烦了,索性干脆传pass进exec,把pass每个指针指向xargc数组始址。至于
pass[xargc+1] = 0;,指针赋0表示指针为空,不用担心报错。为了下次继续使用,我们再把pass[xargc+1] = xargv[xargc+1];重新指向xargc即可。
最后make grade得到 Score: 100/100 的美好分数,感觉世界都美好了起来(虽然才是第一个lab)
当然别忘了push所有的分支到远程仓库以免意外,然后切到新的 sh 分支,准备迎接新的实验。
1 | git remote rename origin old_origin |
Simple xv6 shell
Your job is to write a simple shell for xv6. It should be able to run commands with arguments, handle input and output redirection, and set up two-element pipelines. Your shell should act like the xv6 shell sh for these examples as well as similar commands:
1 | echo hello there |
You should put your shell source in user/nsh.c, and modify the Makefile to compile it. Your shell should use @ (at sign) as a prompt rather than $, to avoid confusion with the real shell.
gets()一次读一行,但它不像read()它是读不到’\n’的哦,会自动把’\n’替换成’\0’这个问题坑了我好一会儿。
redirect(int k, int pd[])是个重定向函数。dup(fd)调用会复制fd给当前一个当前最小可用描述符,并把这个描述符return出来,这样这两个描述符就会共享一个文件偏移。如果先把fd=1关了,再dup(pd[1])那之后标准输出就会同时写进pd[1]即写入pipe中对pd[1];如果是把fd=0关了,再dup(pd[0])就会把从pipe中读取的数据作为标准输入看待。当然因为我们是重定向,不是双开,所以只会把管道原先两端fd给close掉。
handle,argc从0开始,而不是像main函数中的从1开始。然后对于重定向的处理,我们只用变量pos定位输入输出参数的位置,之后会用pass2把<和>从参数行里过滤掉。然后handle_cmd()开了多个子进程去实现管道。
1 |
|
真的,别的不多说,当执行testsh nsh后出现 passed all tests 这句的时候,喜极而泣 泣不成声 声泪俱下QAQ
BTW这个lab我参考sh.c得不多,因为nsh远没有sh复杂,作为lab我觉得不太需要那么严谨的设计,所以更多参考了github上更亲民的设计实现,同时进行了相关的设计修改。
Allocator for xv6
快git fetch后git checkout alloc开始新的lab吧。
For this lab we have replaced the page allocator in the xv6 kernel with a buddy allocator. You will modify xv6 to use this allocator to allocate and free file structs so that xv6 can have more open file descriptors than the existing system-wide limit
NFILE. Furthermore, you will implement an optimization that reduces the buddy’s use of memory. You are done if your modified kernel passes both alloctest and usertests.
在此之前,我们先来看看xv6文件系统的文件描述符层。UNIX 接口很爽的一点就是大多数的资源都可以用文件来表示,包括终端这样的设备、管道,当然,还有真正的文件。文件描述符层就是实现这种统一性的一层。
xv6 每个进程都有一个自己的打开文件表,每一个打开文件都由结构体 file(3750)表示,它是一个对 i 节点或者管道和文件偏移的封装。每次调用 open 都会创建一个新的打开文件(一个新的 file结构体)。如果多个进程相互独立地打开了同一个文件,不同的实例将拥有不同的 i/o 偏移。另一方面,同一个文件可以(同一个file结构体)可以在一个进程的文件表中多次出现,同时也可以在多个进程的文件表中出现(一个进程用 open 打开了一个文件而后使用 dup,或者把这个文件和子进程共享都会导致这一点发生)对每一个打开的文件都有一个引用计数,一个文件可以被打开用于读、写 or both, readable域和writable域记录这一点。
1 | struct file { |
Task1
Modify
kernel/file.cto use the buddy allocator so that the number of file structures is limited by memory rather thanNFILE.
struct ftable
首先,要舍弃原先方式,我们先把file.c里ftable结构体的struct file file[NFILE]注释掉。
1 | struct { |
系统中所有的打开文件都存在于一个全局的文件表 ftable 中。这个文件表有一个分配文件的函数filealloc,有一个重复引用文件的函数filedup,释放对文件引用的函数fileclose,读和写文件的函数fileread 和 filewrite
filealloc()
filealloc (5225)扫描整个文件表找一个没被引用,即引用数ref=0的文件,然后改完它的ref后把它return出来。但这样整个系统的文件数会被ftable的file数组大小所限制,因而改用伙伴系统bd_malloc()申请新文件。
1 | // Allocate a file structure. |
void * bd_malloc(uint64 nbytes)会allocate nbytes,但必须大于LEAF_SIZE=16即最小的block size,还有一点,bd_malloc doesn’t clear the memory it returns; instead, allocated memory starts out with whatever content it had from its last use. Callers should not assume that it starts out containing zeroes. 所以需要手动memset(f, 0, sizeof(struct file));置0一下。
1 | // Allocate a file structure. |
fileclose()
fileclose (5264)减少引用计数。当一个文件的引用计数变为0的时候,fileclose就会释放掉当前的管道或者i 节点(根据文件类型的不同)我们在原函数的最后加上bd_free(f)即可。虽然官方说可以优化掉ff,但我实操并没有成功,估计还是对源码领悟不够,这里就先不优化了(TO DO)
1 | // Close file f. (Decrement ref count, close when reaches 0.) |
Task2
The buddy allocator is space inefficient. The
allocarray has a bit for each block for each size. There is a clever optimization that reduces the cost to only one bit for each pair of blocks. This single bit is B1_is_free XOR B2_is_free, for a buddy pair of blocks B1 and B2. Each time a block is allocated or freed, you flip the bit to reflect the change. For example, if B1 and B2 are allocated, the bit will be zero and if B1 is freed the bit changes to 1. If the bit is 1 and B2 is freed, then we know that B1 and B2 should be merged. Saving 1/2 bit per block matters when xv6 uses the buddy allocator for the roughly 128 Mbyte of free memory that xv6 must manage: this optimization saves about 1 MByte of memory.
buddy allocator中维护了两个bitset,一个存是否分裂 bd_sizes[k].split,另一个存是否已占用 bd_sizes[k].alloc。根据官方给的提示,编写好bit_toggle()和bit_isset(),并对所有的bd_sizes[k].alloc把bit_set()替换成bit_toggle()并把所有的bit_isset()替换成bit_get()即可。
1 | // Return 1 if bit at position index in array is set to 1 |
因为 buddy allocator 管理内存的同时需要在内存区域头部放一些 metadata,且内核提供内存区域的长度也很可能不是对其 2^k 次方的,故需要把一些区域 mark 为 allocated 。同时这些区域对应的 buddy 可能需要被加入 free_list (bd_initfree()/bd_initfree_pair() 用来完成此工作)
根据 bd_init() 中代码:
1 | // done allocating; mark the memory range [base, p) as allocated, so |
这些不可用内存对应的内存区间为 [begin, p) 和 [end, HEAP_SIZE)。在 bd_initfree_pair() 中特判这些内存范围,就可以把他们的 buddy 识别出来,而无需查找 bd_sizes[k].alloc 。
xv6 lazy page allocation
老规矩了, git fetch后git checkout lazy 开始新的lab吧。
一个 x86 页表就是一个包含 2^20(1,048,576)条页表条目(PTE)的数组。每条 PTE 包含了一个 20 位的物理页号(PPN)及一些标志位。分页硬件要找到一个虚拟地址对应的 PTE,只需使用其高20位来找到该虚拟地址在页表中的索引,然后把其高 20 位替换为对应 PTE 的 PPN。而低 12 位是会被分页硬件原样复制的。因此在虚拟地址-物理地址的翻译机制下,页表可以为操作系统提供对一块块大小为 4096(2^12)字节的内存片,这样的一个内存片就是一页。
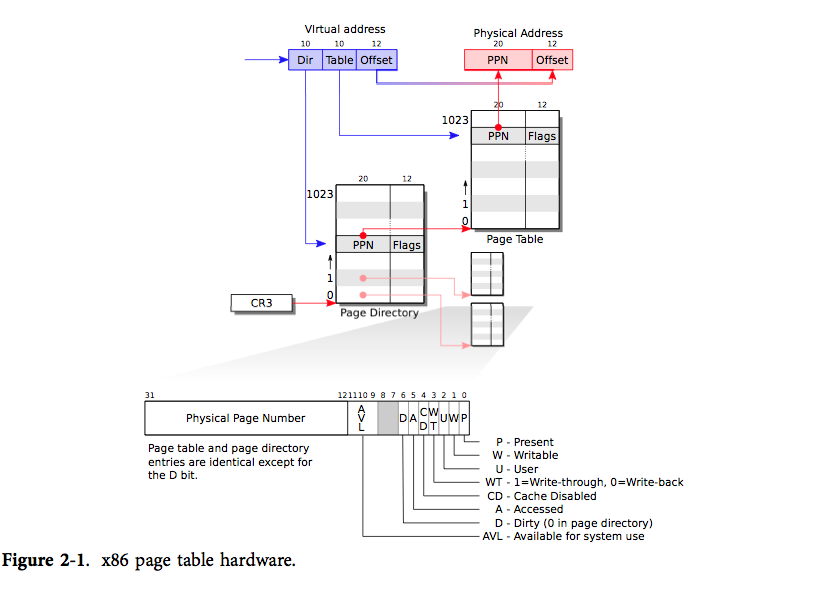
如果用一级页表,那么连续的(`K号页对应的页表项位置 = 页表起始地址 + K 页表项长度`,所以这就要求页表存储必须是连续的)*2^20页表项属实太占空间,本来页表就是为了离散存储,如果整了个巨大的连续页表,显得有些本末倒置。
所以x86采用二级页表,把页表项按页的大小(2^12B)分页离散存在内存中,通过页目录项Dir来定位页表项所在的页框,然后根据Table来确定页表项位置,最后再根据偏移量Offset来确定实际内存地址。
One of the many neat tricks an O/S can play with page table hardware is lazy allocation of user-space heap memory. Xv6 applications ask the kernel for heap memory using the sbrk() system call. In the kernel we’ve given you, sbrk() allocates physical memory and maps it into the process’s virtual address space. However, there are programs that use sbrk() to ask for large amounts of memory but never use most of it, for example to implement large sparse arrays. To optimize for this case, sophisticated kernels allocate user memory lazily. That is, sbrk() doesn’t allocate physical memory, but just remembers which addresses are allocated. When the process first tries to use any given page of memory, the CPU generates a page fault, which the kernel handles by allocating physical memory, zeroing it, and mapping it. You’ll add this lazy allocation feature to xv6 in this lab.
简单说这次lab就是 lazy page allocation,一开始不申请物理内存,只有要用的时候再缺页中断去申请实际内存。
Print page table
It’s often worthwhile to invest time writing code that helps debugging, so your first task is to implement a function that prints the contents of a page table. Define the function in kernel/vm.c; it has the following prototype:
void vmprint(pagetable_t). This function will be handy for debugging and will make you familiar with RISC-V page tables. Insert a call tovmprintin exec.c to print the page table for the first user process.The first line prints the address of the argument of
vmprint. Each PTE line shows the PTE index in its page directory, the pte, the physical address for the PTE. The output should also indicate the level of the page directory: the top-level entries are preceeded by “..”, the next level down with another “..”, and so on. You should not print entries that are not mapped.
1 | void printwalk(pagetable_t pagetable, int depth) |
之后我们按照官方说明,修改下 /kernel/exec.c 和 /kernel/defs.h即可。最后结果如下:the top-level page directory has mappings for entry 0 and 255. The next level down for entry 0 has only index 0 mapped, and the bottom-level for that index 0 has entries 0, 1, and 2 mapped.
page table 0x0000000087f6e000
..0: pte 0x0000000021fda801 pa 0x0000000087f6a000
.. ..0: pte 0x0000000021fda401 pa 0x0000000087f69000
.. .. ..0: pte 0x0000000021fdac1f pa 0x0000000087f6b000
.. .. ..1: pte 0x0000000021fda00f pa 0x0000000087f68000
.. .. ..2: pte 0x0000000021fd9c1f pa 0x0000000087f67000
..255: pte 0x0000000021fdb401 pa 0x0000000087f6d000
.. ..511: pte 0x0000000021fdb001 pa 0x0000000087f6c000
.. .. ..510: pte 0x0000000021fdd807 pa 0x0000000087f76000
.. .. ..511: pte 0x000000002000200b pa 0x0000000080008000
Eliminate allocation from sbrk()
Your first task is to delete page allocation from the sbrk(n) system call implementation, which is the function sys_sbrk() in sysproc.c. The sbrk(n) system call grows the process’s memory size by n bytes, and then returns the start of the newly allocated region (i.e., the old size). Your new sbrk(n) should just increment the process’s size (myproc()->sz) by n and return the old size. It should not allocate memory — so you should delete the call to growproc() (but you still need to increase the process’s size!).
我们不再调用growproc(),然后考虑到官方说的 Handle negative sbrk() arguments. 通过 sbrk 输入负数来归还线性空间时,需要及时释放内存dealloc 。所以将原先的if(growproc(n) < 0) return -1;改成:
1 | myproc()->sz += n; |
关于myproc()以下是 myproc() 和 proc 结构体的源码:1
2
3
4
5
6
7
8
9
10
11
12
13
14
15
16
17
18
19
20
21
22
23
24
25
26
27
28
29
30
31// Return the current struct proc *, or zero if none.
struct proc* myproc(void) {
push_off();
struct cpu *c = mycpu();
struct proc *p = c->proc;
pop_off();
return p;
}
// Per-process state
struct proc {
struct spinlock lock;
// p->lock must be held when using these:
enum procstate state; // Process state
struct proc *parent; // Parent process
void *chan; // If non-zero, sleeping on chan
int killed; // If non-zero, have been killed
int xstate; // Exit status to be returned to parent's wait
int pid; // Process ID
// these are private to the process, so p->lock need not be held.
uint64 kstack; // Bottom of kernel stack for this process
uint64 sz; // Size of process memory (bytes)
pagetable_t pagetable; // Page table
struct trapframe *tf; // data page for trampoline.S
struct context context; // swtch() here to run process
struct file *ofile[NOFILE]; // Open files
struct inode *cwd; // Current directory
char name[16]; // Process name (debugging)
};
当然,这会出现官方所认证的panic,毕竟事实上我们并没有进行mapping。
2
3
4
5
6
usertrap(): unexpected scause 0x000000000000000f pid=3
sepc=0x0000000000001258 stval=0x0000000000004008
va=0x0000000000004000 pte=0x0000000000000000
panic: uvmunmap: not mapped
Lazy allocation
Modify the code in trap.c to respond to a page fault from user space by mapping a newly-allocated page of physical memory at the faulting address, and then returning back to user space to let the process continue executing. You should add your code just before the
printfcall that produced the “usertrap(): …” message. Your solution is acceptable if it passes usertests.
A good way to start this lab is by fixing usertrap() in trap.c so that you can run “echo hi” in the shell again. 该函数是专门处理中断、异常和系统调用的,r_scause()为13的话是 Page load fault,为15的话是 Page store fault,以此处理逻辑。这里用函数handle_page_fault(p, r_stval())来处理异常的情况然后kill掉。
1 | } else if (r_scause() == 13 || r_scause() == 15) { |
然后我们在proc.c里把该函数写好,并把函数头注册到defs.h里。
- Kill a process if it page-faults on a virtual memory address higher than any allocated with sbrk().
- Handle out-of-memory correctly: if kalloc() fails in the page fault handler, kill the current process.
1 | int handle_page_fault(struct proc* p, uint64 addr) { |
- Handle fork() correctly.
在vm.c里的uvmunmap()函数,忽视掉page directory is not mapped定义的panic(“uvmunmap: walk”)和page not mapped定义的panic(“uvmunmap: not mapped”) 注意这两个判断,每个判断成功都应该直接goto到if(a == last) break;语句这。在vm.c里的uvmcopy()函数,忽视掉page may be not present定义的panic(“uvmcopy: pte should exist”)和panic(“uvmcopy: page not present”) 这两个也是每次判断成功都会进入到下一个循环。
1 | // Remove mappings from a page table. The mappings in the |
- Handle the case in which a process passes a valid address from sbrk() to a system call such as read or write, but the memory for that address has not yet been allocated.
You can fix it by add code in walkaddr() in kernel/vm.c:104, as any r/w syscall will invoke walkaddr to get physical address. 我们首先可以看下walkaddr函数
1 | // Look up a virtual address, return the physical address,or 0 if not mapped. |
在vm.c加上spinlock.h和proc.h头文件后,我们对walkaddr函数进行修改
1 | uint64 walkaddr(pagetable_t pagetable, uint64 va) { |
- Handle faults on the invalid page below the stack.
As the page below the stack is set PTE_V but not set PTE_U, you can distinguish it in mappages() at vm.c:164. 在vm.c里的mappages()函数把if(*pte & PTE_V) panic(“remap”);修改为
1 | if(*pte & PTE_V) { |
Multithreading
To start the lab, switch to the trap branch:
1 | git fetch |
Before writing code, you should make sure you have read “Chapter 6: Scheduling” from the xv6 book and studied the corresponding code.
多路复用
关于IO多路复用,可以看上一篇 Linux IO 来回顾一下知识点: )
关于xv6的IO多路复用,实现如下:当一个进程等待磁盘请求时,xv6 使之进入睡眠状态,然后调度执行另一个进程。另外,当一个进程耗尽了它在处理器上运行的时间片(100ms)后,xv6 使用时钟中断强制它停止运行,这样调度器才能调度运行其他进程。这样的多路复用机制为进程提供了独占处理器的假象,类似于 xv6 使用内存分配器和页表硬件为进程提供了独占内存的假象。
xv6进程切换
- 如何让上下文切换透明化?xv6 只简单地使用时钟中断处理程序来驱动上下文切换。
- 可能出现多个 CPU 同时切换进程的情况,所以必须使用一个带锁的方案来避免竞争。
- 进程退出时必须释放其占用内存与资源,但由于它本身在使用自己的资源(譬如其内核栈),所以不能由该进程本身释放其占有的所有资源。
同时xv6 必须为进程提供互相协作的方法。譬如,父进程需要等待子进程结束,以及读取管道数据的进程需要等待其他进程向管道中写入数据。与其让这些等待中的进程消耗 CPU 资源,不如让它们暂时放弃 CPU,进入睡眠状态来等待其他进程发出事件来唤醒它们。但我们必须要小心设计以防睡眠进程遗漏事件通知。
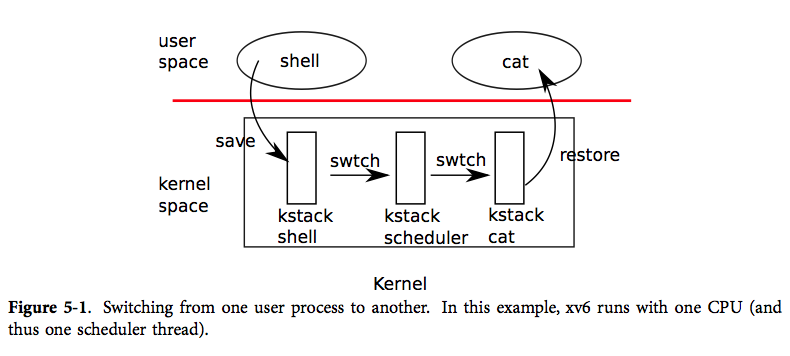
如图,xv6 在低层次中实现了两种上下文切换:从进程的内核线程切换到当前 CPU 的调度器线程,从调度器线程到进程的内核线程。xv6 永远不会直接从用户态进程切换到另一个用户态进程;这种切换是通过用户态-内核态切换(系统调用或中断)、切换到调度器、切换到新进程的内核线程、最后这个陷入返回实现的。
每个 xv6 进程都有自己的内核栈以及寄存器集合。每个 CPU 都有一个单独的调度器线程,这样调度就不会发生在进程的内核线程中,而是在此调度器线程中。线程的切换涉及到了保存旧线程的 CPU 寄存器,恢复新线程之前保存的寄存器;其中 %esp 和 %eip 的变换意味着 CPU 会切换运行栈与运行代码。
swtch 并不了解线程,它只是简单地保存和恢复寄存器集合,即上下文。当进程让出 CPU 时,进程的内核线程调用 swtch 来保存自己的上下文然后返回到调度器的上下文中。每个上下文都是以结构体 struct context* 表示的,这实际上是一个保存在内核栈中的指针。swtch 有两个参数:struct context **old、struct context *new。它将当前 CPU 的寄存器压入栈中并将栈指针保存在 *old 中。然后 swtch 将 new 拷贝到 %esp 中,弹出之前保存的寄存器,然后返回。
- 可能出现多个 CPU 同时切换进程的情况,所以必须使用一个带锁的方案来避免竞争。
如果将 swtch 看做一个既有功能。进程想要让出 CPU 必须要获得进程表的锁 ptable.lock,并释放其拥有的其他锁,修改自己的状态(proc->state),然后调用 sched。在对 swtch 的调用的整个过程中,xv6 都持有锁 ptable.lock:swtch 的调用者必须持有该锁,并将锁的控制权转移给切换代码。锁的这种使用方式很少见,通常来说,持有锁的线程应该负责释放该锁,这样更容易让我们理解其正确性。但对于上下文切换来说,我们必须使用这种方式,因为 ptable.lock 会保证进程的 state 和 context 在运行 swtch 时保持不变。如果在 swtch 中没有持有 ptable.lock,可能引发这样的问题:在 yield 将某个进程状态设置为 RUNNABLE 之后,但又是在 swtch 让它停止在其内核栈上运行之前,有另一个 CPU 要运行该进程。其结果将是两个 CPU 都运行在同一个栈上,这显然是不该发生的。
Warmup: RISC-V assembly
There is a file user/call.c in your xv6 repo. make fs.img builds a user program call and a readable assembly version of the program in user/call.asm.
打开 user/call.c ,有如下代码片段:
1 |
|
打开user/call.asm,如下:
1 | 000000000000001c <main>: |
下面来回答问题:
- Which registers contain arguments to functions? For example, which register holds 13 in main’s call to printf?
- 根据 riscv user-level isa (在
doc/riscv-calling.pdf) , a0-a7 和 fa0-fa7 共计 16 个寄存器会用于传递参数 - 具体而言,根据以上代码,可以得知 a2 寄存器用于存传给 printf 的参数
13
- 根据 riscv user-level isa (在
- Where is the function call to f from main? Where is the call to g? (Hint: the compiler may inline functions.)
- 注意括号里的话。根据笔算我们知道
f(8)+1 = 12,又发现 main 中并未调用 f 函数,说明 f 在编译期被直接优化成一个常量12塞到 a1 寄存器里了。
- 注意括号里的话。根据笔算我们知道
- At what address is the function printf located?
- 观察 main 函数,在调用时使用了代码
auipc ra,0x0和jalr 1440(ra),前者取当前指令的 pc 加上 0x0 存入 ra,后者跳转到 ra + 1440。计算知0x0000000000000030 + 1440 = 0x00000000000005d0。经验证是 printf 的入口地址。
- 观察 main 函数,在调用时使用了代码
- What value is in the register ra just after the jalr to printf in main?
- 此题需要看 rv spec 。
jalr指令完成后,ra寄存器会存储返回点位置(也即 pc + 4 )
- 此题需要看 rv spec 。
Uthread: switching between threads
In this exercise you will design the context switch mechanism for a user-level threading system, and then implement it. Your job is to come up with a plan to create threads and save/restore registers to switch between threads, and implement that plan.
You should complete thread_create to create a properly initialized thread so that when the scheduler switches to that thread for the first time, thread_switch returns to the function passed as argument func, running on the thread’s stack. You will have to decide where to save/restore registers. Several solutions are possible. You are allowed to modify struct thread. You’ll need to add a call to thread_switch in thread_schedule; you can pass whatever arguments you need to thread_switch, but the intent is to switch from thread t to the next_thread.
Some hints:
thread_switchneeds to save/restore only the callee-save registers. Why? 这是因为协程切换的过程本质是一个函数调用,因此caller-save registers是被调用者(如thread_a())保存好的。You can add fields to
struct threadinto which to save registers.You can see the assembly code for uthread in user/uthread.asm, which may be handy for debugging.
To test your code it might be helpful to single step through your
thread_switchusingriscv64-linux-gnu-gdb. You can get started in this way:
2
3
4
> Reading symbols from user/_uthread...
> (gdb) b thread.c:60
>
>
This sets a breakpoint at a specified line in thread.c. The breakpoint may (or may not) be triggered before you even run
uthread. How could that happen?Once your xv6 shell runs, type “uthread”, and gdb will break at line
thread_switch. Now you can type commands like the following to inspect the state ofuthread:(gdb) p/x *next_threadWith “x”, you can examine the content of a memory location:
(gdb) x/x next_thread->stackYou can single step assembly instructions using:
(gdb) siOn-line documentation for gdb is here.
然后我们研究以下代码该怎么写(抄):
- 首先打开
kernel/swtch.S,查阅 riscv calling convention ,验证这段代码可以完成寄存器的切换。注意 ra 表示返回地址,sp 表示当前栈顶。直接复制到user/uthread_switch.S即可。- 接着在
kernel/proc.h中,找到上述代码配套的context结构体声明,复制到user/uthread.c中。
- 接着在
- 修改几行代码。当发生协程切换时调用
uthread_switch(old_ctx, new_ctx),完成寄存器状态的切换;当新建协程时,将 ra 设为协程入口点地址,sp 设为thread.stack的最高地址(栈底)。
第三部相对有思维量的代码如下,可以证明是正确的:
1 | t->ctx.ra = (uint64) func; |